 Ctrl + B
 Cmd + B
ConceptDraw V offers a variety of ways of working with shapes. You can change shape properties, assign text and hyperlinks, rotate and resize shapes and many more.
Selecting
Copying and Pasting
Duplicating
Moving
Rotating and Flipping
Resizing
Reshaping
Changing the Front-to-Back Order
Distributing Shapes
Aligning Shapes
The Join, Combine and Separate Operations
Grouping and Ungrouping
Substituting a Shape with another Shape
Copying Shape's Visual Attributes
Deleting
Undo and Redo
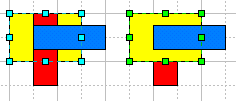
Each time you draw a shape, or take it from another document or from a library and drop on the page, the shape gets registered in the order list. ConceptDraw displays shapes according to their position in the order list, so most recent shapes may overlap the ones you created earlier.
Sometimes you may want to change the display order of the shapes. To put the selected shapes to back or to front in the view, you can use the following operations:
1) Send To Back - sends the shape to the back of the order
list, so that it is displayed behind all other shapes.
Select the Send To Back item in the Shape / Display
Order menu or use the keyboard shortcut:
 Ctrl + B Ctrl + B |
 Cmd + B Cmd + B |

2) Bring To Front - brings the shape to the front of the
order list, so that it is displayed above all other shapes.
Select the Bring To Front item in the Shape / Display
Order menu or use the keyboard shortcut:
 Ctrl + F Ctrl + F |
 Cmd + F Cmd + F |

3) Send Backward - positions the shape one
step higher in the order list.
Select the Send Backward item in the Shape / Display
Order menu or use the keyboard shortcut:
 Ctrl + Shift + B Ctrl + Shift + B |
 Cmd + Shift + B Cmd + Shift + B |

4) Bring Forward - positions
the shape one step higher in the order list.
Select the Bring Forward item in the Shape / Display
Order menu or use the keyboard shortcut:
 Ctrl + Shift + F Ctrl + Shift + F |
 Cmd + Shift + F Cmd + Shift + F |

The Distribute tools lets you place three or more shapes at equal distances between the alignment boxes (or between their sides or centers). This operation can be applied to 2-D shapes only.
The shapes are distributed with respect to the primary shape (the one that displays green handles).
You can choose among the following 8 distribution options:
Horizontal -
 Distribute Horizontal Spacing -
creates unified distances between the alignment boxes,
 Distribute Left Edges -
between the left edges of the alignment boxes,
 Distribute Centers -
between the centers of the shapes,
 Distribute Right Edges -
between the right edges of the alignment boxes;
Vertical -
 Distribute Vertical Spacing -
creates unified distances between the alignment boxes,
 Distribute Top Edges -
between the top edges of the alignment boxes,
 Distribute Middle -
between the centers of the shapes,
 Distribute Bottom Edges -
between the bottom edges of the alignment boxes.
All these commands are also available from the Shape / Distribute menu, or you can use the Arrange toolbar (see the Toolbars - Arrange section)
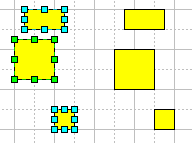
Here you can see how the Distribute Vertical Spacing option works: it unifies the vertical spacing between the shapes.

When several shapes are selected, you can align them in different ways with respect to the primary selected shape (the one displaying green handles). The Align tool places the shapes so that their alignment boxes are arranged along a certain horizontal or vertical line. This line is related to the primary shape, going either along one of the sides, or through the center of its alignment box.
There are 6 alignment types:
Vertical -
 Align
Left ,
 Align
Center,
 Align Right.
Horizontal-
 Align Top,
 Align
Middle,
 Align
Bottom.
These commands can be performed from the Shape / Align menu. You can also use the Arrange toolbar (see Toolbars - Arrange)
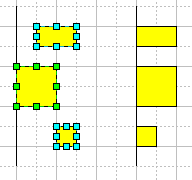
Here's an example of the Align Left operation:
